
Engorged Tick on Dog: What to Look For and Next Steps
Learn which signs in a photo point to an engorged tick on dog, what a single image cannot show, and practical next steps before contacting a veterinarian.
Quick answer: spotting an engorged tick on a dog
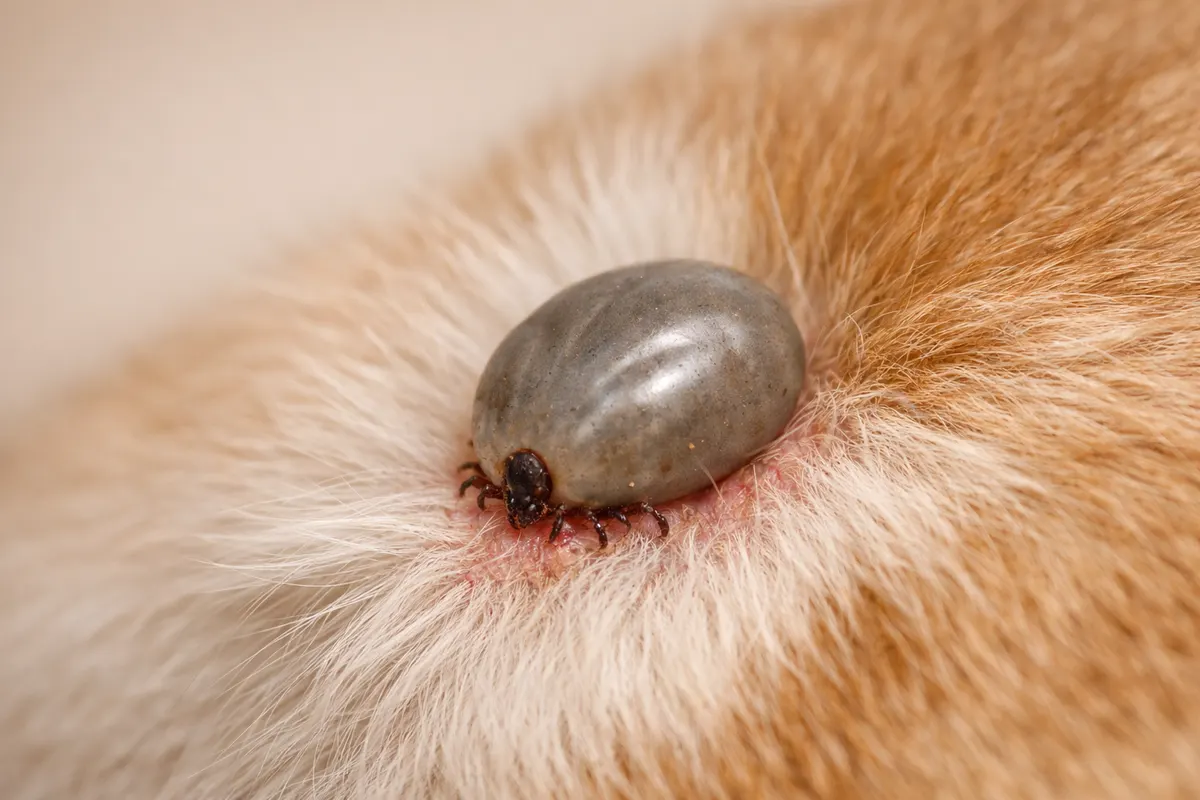
An engorged tick on dog usually looks like a rounded, ballooned insect attached to the skin. In photos you’ll most often see a smooth, pale or greyish oval body that’s noticeably larger than an unfed tick and a small mouth area anchored at the skin. Legs or mouthparts may be visible around the edge.
A single clear photo can support a confident visual ID when the body shape, size, and attachment point are obvious. However, photos cannot prove whether the tick carried pathogens, how long it was feeding, or whether a raised lump is actually a skin tag, scab, or embedded foreign object. If you’re unsure whether the spot is an attached tick, or if removal is difficult, contact your veterinarian.
If you confirm it’s a tick and you feel confident removing it, use steady, careful removal and record the time and location on your dog. If the lump looks unusual (hard, rapidly growing, painless bump) or you notice illness in your dog, seek veterinary care rather than trying to diagnose from photos alone.
- Look for a swollen, rounded body attached to the skin—not just a dark dot.
- Check for 8 legs (adult or nymph) or 6 legs (larva) when visible to confirm it’s an arachnid.
- If unsure, photograph with scale and angles, then get veterinary advice rather than guessing.
What an engorged tick on a dog actually is
An engorged tick is a feeding tick whose body has stretched to hold blood. Ticks go through life stages—larva, nymph, and adult—and their appearance changes as they feed. Adults and nymphs that have been attached for hours or days can swell dramatically, changing from flat to a rounded, leaf- or balloon-like shape. The degree of engorgement helps estimate how long the tick has been feeding, but a photo alone cannot give an exact feeding time.
Body shape matters: a flat, teardrop outline suggests an unfed or partially fed tick; a smooth, oval, bloated shape points to engorgement. Color shifts from brown or black (unfed) to pale grey, tan, or bluish when engorged. Mouthparts (the capitulum) anchor into the skin; if those are visible and positioned at the skin surface, that’s a strong sign of an attached tick rather than a superficial speck.
But lookalikes exist. A small skin cyst, scab, embedded burr, or a healed wound can mimic a round lump. Some skin tags or insect pupae may appear similar in size and color. When the lump moves independently of the skin or the lesion has a different texture than the surrounding skin, treat the finding with more caution and consider veterinary evaluation before attempting removal.
- Engorgement indicates feeding; the body gets much larger and paler than an unfed tick.
- Life stage changes: larva (6 legs) < nymph/adult (8 legs); leg count is a useful visible clue when legs can be seen.
- Attachment point and visible mouthparts are the clearest sign that the object is a tick rather than a skin lesion.
Key visual clues to check on an engorged tick on dog
Start by photographing the spot from several angles and with a ruler or coin next to it for scale. Good reference in the image helps you and any veterinarian judge size and detail. Examine body shape, surface texture, color, and whether the object appears to be anchored into the skin.
Count or look for legs when possible. Most adult and nymph ticks have eight legs; larvae have six. If legs are tucked under an engorged body they may be hard to see, but any visible limbs around the edge strongly indicate an arachnid rather than a skin tag or wart.
Check the mouth area: a small dark head or mouthparts at the base of the lump where it meets the skin suggests attachment. Absence of a visible mouthpart isn’t definitive—heavy engorgement or hair can obscure the capitulum—so combine this with other clues before deciding.
- Body shape: smooth, rounded, enlarged oval typical of engorgement.
- Color: pale grey/cream or bluish when heavily engorged versus darker brown when unfed.
- Attachment: a tiny dark mouth area at the skin surface or concentric skin redness.
- Leg count: 8 legs for nymphs/adults if visible (larvae have 6).
- Size scale: ticks can grow from a few millimeters to ~1 cm+ when engorged—use a ruler in photos.
- Mobility: an attached tick won’t move separately from the skin; a loose insect will shift independently.
Step-by-step checks and safe next actions
Step 1 — Stabilize and document. Keep your dog calm and still; have someone help if needed. Take at least two clear photos: a close-up showing detail and one wider shot showing the tick’s position on the body with a ruler or coin for scale. Note the date and the dog’s activity before discovery (e.g., recent walk in wooded area). These details help a veterinarian assess exposure risk.
Step 2 — Decide whether you can remove it safely. If the lump clearly shows a tick body with mouthparts attached and you have a suitable tick-removal tool or fine-tipped tweezers, you can remove it yourself using steady, straight traction. Grasp the tick as close to the skin as possible—avoid squeezing the rounded abdomen—and pull straight outward with even pressure until it releases. After removal, clean the site with disinfectant and monitor for redness or irritation.
Step 3 — When to get veterinary help. Do not attempt removal if the attachment point is unclear (it could be a skin growth), if mouthparts are deeply embedded, if the tick is in a sensitive area (near the eye, inside the ear canal), if you cannot remove it in one steady motion, or if your dog shows signs of illness (lethargy, fever, lameness, loss of appetite). In those cases, contact your veterinarian promptly. If you remove the tick yourself and are concerned about possible exposure, record the time of removal and consider saving the tick in a sealed container for possible later testing per your vet’s advice.
Step 4 — Record and follow up. Note the date, location on the dog’s body, and any signs in the hours and days after removal. A single photo cannot show pathogen presence; watch for behavioral or medical changes and consult your vet if symptoms develop. For any uncertainty about the lump’s identity before removal, choose veterinary assessment rather than risky home remedies.
- Photograph with scale and multiple angles before touching the area.
- If removing, use fine-tipped tweezers or a tick hook and pull straight out; avoid squeezing the body.
- Clean the site and watch for local infection or systemic signs for 14–21 days.
- Seek veterinary care instead of attempting home removal for unclear lumps or difficult locations.
Practical examples: common scenarios and what to do
Scenario A — Large, pale, ballooned lump on flank after a hike. Close-up shows a smooth oval body with a tiny dark mouth near the skin and faint legs at the edge: likely an engorged adult tick. Action: photograph with ruler, remove carefully if you have experience and tools, clean the site, and note date/time. If you’re uncomfortable, take the dog to the vet.
Scenario B — Small, pinhead bump in a hairless area that doesn’t move with the skin and looks like a hard nodule: more likely a cyst or skin tag than a tick. Action: don’t attempt to remove; schedule a vet exam to diagnose and avoid accidentally damaging healthy tissue.
Scenario C — Dark, flat speck that lifts away from the skin when nudged: probably a loose debris particle or mite. Action: gently remove the debris; if it resists or the dog is irritated, photograph and consult your vet.
Scenario D — Tiny translucent dot with only 6 visible legs when magnified: likely a larval tick. Larvae feed and fall off faster than older stages but can still transmit pathogens depending on species and geography. Action: remove carefully and monitor; consult your vet about next steps and any testing options.
- Clear engorgement + visible mouthparts = candidate for careful removal.
- Hard, immobile nodules need veterinary diagnosis, not home removal.
- Loose debris or insects that detach easily are not attached ticks.
- Leg count and translucence help differentiate larvae from other stages.
Limitations: what photos can’t prove and when to escalate
Photos are valuable for initial triage but have strict limits. A picture can show shape, color, size, and whether the object appears attached, but it cannot determine pathogen carriage, how long the tick has been feeding with medical precision, or whether microscopic mouthparts remain embedded after removal attempts. For those answers you need veterinary exam and, in some cases, laboratory testing.
Never use a single photo to rule out disease or to decide against veterinary care when the dog shows symptoms. Signs like fever, unusual lethargy, loss of appetite, unexplained lameness, or swollen lymph nodes require professional assessment regardless of how convincing the photo looks.
Photos also cannot safely validate risky removal methods. Do not apply heat, petroleum jelly, or chemicals to try to force a tick out—those approaches can damage the tick or skin and increase the chance of mouthparts remaining embedded. If a tick is in a sensitive location, if you can’t remove it cleanly, or if the lesion’s identity is uncertain, escalate to your veterinarian.
- High-confidence photo outcomes: visible legs, mouthparts at skin, rounded engorged body.
- Partial outcomes: heavy hair coverage, obscured mouthparts, or small size—these need extra checks.
- Uncertain outcomes: hard nodules, scabs, or wounds where the identity cannot be verified in a photo.
- When in doubt, prioritize veterinary exam over risky home removal or delayed care.
Related guides
Next step: use the Dog Tick Detector tool for a guided checklist
If you want a structured next step after your visual checks, try the Dog Tick Detector tool for guided photo tips and a practical checklist: https://tick-detector.app/tools/dog-tick-detector. Use the tool as a first-pass to organize photos and observations, then follow the safe removal and veterinary escalation guidance in this article when needed.
Take the next step →Frequently asked questions
How can I tell if a lump on my dog is an engorged tick?
Look for a smooth, rounded oval body attached to the skin with a small mouth area at the base. Visible legs around the edge (usually eight for nymphs/adults) and a pale or bluish, swollen abdomen are strong visual clues. Photograph the area with a ruler for scale. If the object is hard, immobile, or lacks a visible mouthpart, it may be a cyst or skin tag—seek veterinary evaluation before attempting removal.
Is it safe to remove an engorged tick myself?
You can remove a clearly identifiable, easily reachable engorged tick if you have fine-tipped tweezers or a tick removal tool and feel confident. Grasp the tick close to the skin and pull straight outward with steady pressure; avoid squeezing the abdomen. Clean the site afterward. If the tick is in a sensitive location, the attachment is unclear, or mouthparts remain embedded, see your veterinarian instead of persisting with home removal.
Should I save a removed tick for testing?
Saving the tick can be helpful if your veterinarian later recommends pathogen testing. Place the removed tick in a small, sealed container with a moist paper towel or in a zip-top bag and label it with the date and location on the dog’s body. Do not store it on your phone or in a pocket. Follow your veterinarian’s instructions about testing—photos alone do not replace lab diagnostics.
Can a photo tell me if my dog will get sick from a tick bite?
No. A photo cannot reveal whether a tick carried pathogens or whether it transmitted a disease while feeding. Symptoms of tick-borne illness can take days to weeks to appear. Monitor your dog for fever, lethargy, lameness, loss of appetite, or unusual behavior and consult your veterinarian if any signs develop. Use photos only as part of initial documentation—not as a substitute for professional diagnosis.