

Tick Types: How to Identify Common Ticks by Sight
Learn how to recognize tick types with visible clues, a stepwise photo checklist, and realistic limits for identification from a single image.
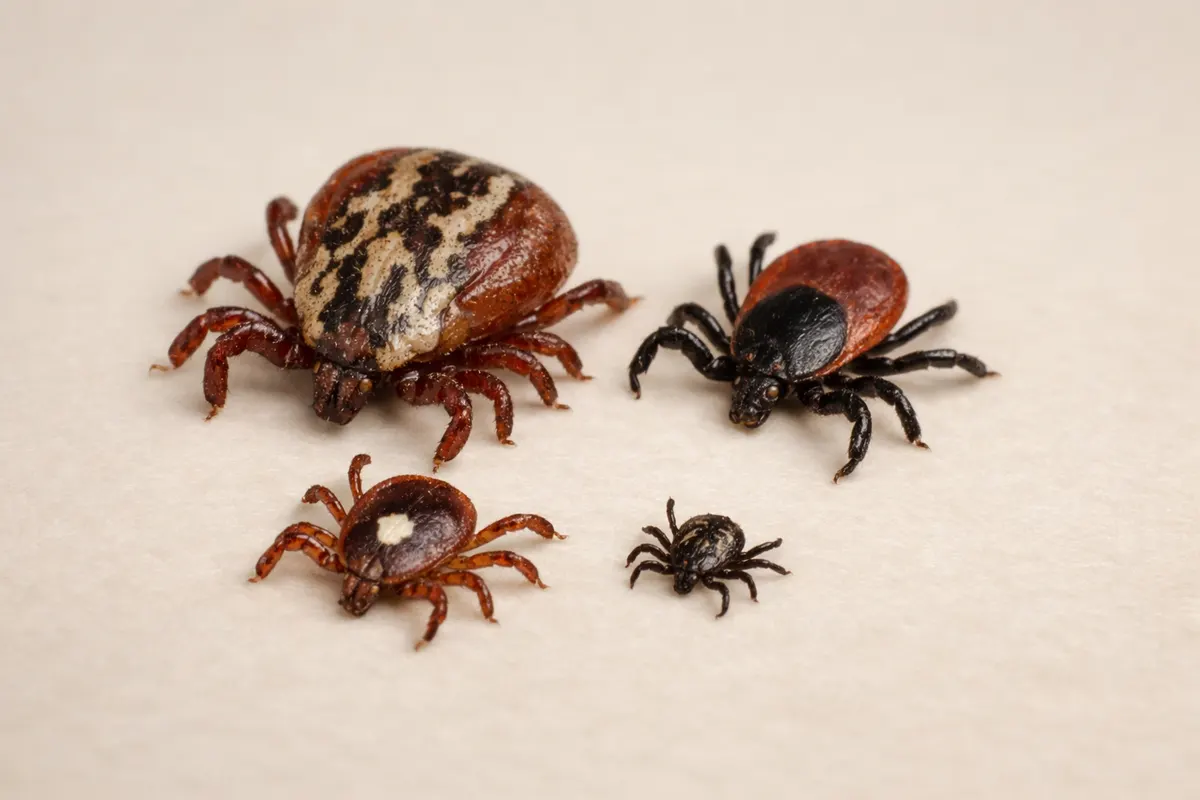
Quick answer: identifying common tick types
If a tick is attached, prompt removal and appropriate care come before photographing or identifying its type. Follow the CDC or your local public-health guidance and do not delay removal while trying to obtain a better picture or an app result. The CDC after-a-tick-bite guidance is available at https://www.cdc.gov/ticks/after-a-tick-bite/index.html. Once the immediate situation has been addressed, a photograph and exposure notes may help a qualified person assess the specimen.
For an already removed or safely observed specimen, visible features can help organize an identification shortlist: body outline, leg count when clearly visible, whether the body is engorged, and any shield or markings shown in the image. Use several observations together. Size, color, and an indistinct head region should not be used to make a confident genus or species claim. A photo or app identification does not show whether a tick carries a pathogen or establish the medical significance of a bite.
What tick types mean in practical terms
When readers ask about tick types, they may be trying to understand a specimen, a bite, or an exposure. Keep those questions separate. Identification can add context, but it must not determine whether you promptly remove an attached tick or whether a person with symptoms seeks medical advice. Record useful information after the immediate care steps rather than waiting for a species label. For pets, use appropriate veterinary guidance rather than assuming that human-care advice applies in the same way.
Type can refer to a life stage, a broad appearance group, or a possible genus or species. Those are different levels of specificity. A clear feature may help describe the specimen without supporting a species name. State what was observed, what remains uncertain, and what evidence would help an expert. This prevents a tentative category from being mistaken for a laboratory identification or a conclusion about infection risk.
Ticks are arachnids. Larvae have six legs, while nymphs and adults have eight, but counting legs in a photograph can be difficult when they overlap or are hidden. Record an unclear count as unknown instead of treating the visible legs as the complete number. A descriptive life-stage note is not a medical risk assessment: removal and advice about an exposure should not wait for that detail to be resolved.
Tick visual clues to identify tick types
Document leg count only when the image is clear enough to support it, and note the body's size with a suitable nearby reference. Do not use size alone to distinguish a larva, nymph, or adult, because photographic scale and the specimen's condition can mislead. More detail may help an expert compare alternatives, but uncertainty should remain visible in the record rather than being replaced with a confident label.
Body shape and the presence of a scutum (hard shield) are next. Hard ticks (Ixodidae) have a distinct dorsal scutum that can be patterned or plain; soft ticks (Argasidae) lack an obvious shield and appear more leathery and wrinkled. A rounded, glossy back with a clear shield behind the head usually indicates a hard tick genus, which includes many commonly encountered species.
Record any visible markings and whether the body appears engorged, while keeping any proposed name provisional. The viewing angle, focus, and feeding condition can hide or distort features. A dark or pale patch is a descriptive clue, not proof of a particular species. If an app or guide suggests a name, keep the original photograph and note that the suggestion still needs verification when the identification matters.
- Leg count: record six, eight, or unknown only as the image supports.
- Shield and markings: document visible details without forcing an unclear image into a type.
- Engorgement: note the apparent condition; it can change the outline and hide markings.
- Image quality: record a missing scale, obstructed view, or uncertain features.
- Exposure context: note the place and date found, and whether the specimen was attached.
Step-by-step: how to check and compare tick types
First, address an attached tick promptly. Follow CDC or local public-health removal guidance, and do not postpone that step to photograph the specimen, count its legs, or identify it with an app. If you are unsure how to proceed, seek appropriate guidance rather than waiting for an image match. Identification is a later information-gathering step; it is not a prerequisite for removal or for getting advice about symptoms.
After removal, if taking a photograph is practical, document the specimen without unnecessary handling or exposure. A clear overall view and a nearby size reference can be more useful than a blurred extreme close-up. Record the date and general exposure location, whether it was attached, and any attachment-duration information you actually know. Leave an uncertain duration unknown. Do not invent a duration or a species name to make the notes look complete.
Compare the photograph with a suitable regional public-health, extension, or entomology resource, using multiple features and the supplied context. A checklist can organize observations, but it should not turn a small dark specimen or a single marking into a confident genus call. If the result is uncertain, retain a broad description and ask the relevant service what additional information is useful. An unidentified or partly identified tick can still be accompanied by a clear, helpful exposure history.
If a receiving service wants the specimen, follow that service's collection, container, labeling, and preservation instructions. Requirements can differ between identification and testing services, so ask before preparing the specimen for submission. Record where it came from and whom you contacted. If rash, fever, or another concerning symptom develops after a tick exposure, seek healthcare advice and mention the exposure; do not wait for a photograph-based identification or a specimen result before doing so.
- Remove an attached tick promptly following appropriate public-health guidance; do not wait for photo ID.
- Photograph an already removed specimen only when practical, and retain uncertainty in the notes.
- Follow the receiving service's specific specimen instructions.
- Seek medical advice for rash, fever, or concerning symptoms after exposure and mention the tick history.
Examples: common tick types and lookalikes
Example 1 — Tiny dark specimen: a small, dark object appears in a phone photograph, but its legs and body boundaries are difficult to resolve. That image is not enough to label it a particular nymph or genus. Record the scale, place found, and whether it was attached, then keep the identification uncertain. If it is still attached, the need for prompt removal comes before improving the photograph or searching for a closer visual match.
Example 2 — Larger specimen with pale markings: a clear overall image shows a shield-like region and patterned areas. Those observations may help a regional expert compare possible ticks, but color and an apparent head outline do not establish a species. Keep both the original view and a wider image with scale if available. If advice is needed about a bite, provide the exposure history rather than relying on the tentative visual category as a risk decision.
Example 3 — Tick-like lookalike: a tiny arthropod or piece of debris resembles a tick in a poor image. A clearer photograph may help show the legs and body outline, but a guide cannot always resolve the uncertainty remotely. State that the specimen is unconfirmed and ask an appropriate local service about the evidence it needs. The point of the comparison is to improve a description, not to dismiss a reported exposure because one photograph is unclear.
Example 4 — Engorged specimen after removal: a swollen body changes its shape and obscures some markings. Save an overall view and a size reference if practical, and record the exposure details you know. Follow the receiving service's directions if it wants the specimen. Do not infer infection status, a precise feeding duration, or a medical outcome from the swollen appearance alone. Symptoms or healthcare questions should be handled independently of how quickly an identification can be obtained.
- A tiny dark specimen can remain unidentified even in a useful exposure record.
- Visible markings support a description, not an automatic species diagnosis.
- Engorgement can obscure features and does not reveal infection status.
- Unclear photo identification must not delay removal or appropriate medical advice.
Limitations when identifying tick types from photos
Photo identification has limits at every level. Hidden legs can undermine a life-stage estimate, an unclear surface can hide a shield or pattern, and many species require specialist examination. Avoid a fixed hierarchy that promises a genus whenever a head region is visible. Instead, describe which features the photograph actually shows and which proposed identifications remain uncertain. That approach makes the record more useful without overstating what an app or guide has established.
Engorgement, angle, low resolution, and background clutter can change the apparent outline and obscure markings. A specimen photographed without a scale can also appear larger or smaller than it is. Additional images may improve the record after immediate care has been addressed, but an attempt to obtain a perfect photograph should not become a reason to postpone action on an attached tick or a concerning symptom.
When you need certainty—because a person or pet is symptomatic, the bite occurred in a high-risk area, or testable evidence is required—seek a public health lab, university entomology department, or extension service for specimen examination. For medical decisions, take the specimen and exposure history to a healthcare provider rather than relying on image-based identification alone.
- Treat species suggestions as preliminary when the evidence is incomplete.
- A photograph does not establish infection status or the significance of a bite.
- Use appropriate public-health or healthcare guidance for removal and exposure concerns.
- Follow the receiving expert or service's instructions when further identification is needed.
Related guides
Next step: record useful details after immediate care
After an attached tick has been addressed according to appropriate public-health guidance, the Tickzen identification chart at https://tick-detector.app/tools/tick-identification-chart can help you organize visible observations. Treat its suggestions as preliminary, retain the original image, and note any uncertainty. The CDC guidance at https://www.cdc.gov/ticks/after-a-tick-bite/index.html is a source for immediate next steps. Photo identification must not delay removal or healthcare advice about symptoms following an exposure.
Take the next step →Frequently asked questions
Where can I find a tick identification guide if I only have a phone photo?
Use suitable local public-health, university extension, or entomology resources that explain their identification limits. For an already removed specimen, a clear overall photograph, nearby size reference, date, and exposure location can help. Do not delay removing an attached tick to collect photographs or obtain an app result. Follow CDC or local public-health guidance for the immediate steps and seek healthcare advice when symptoms or other exposure concerns arise.
How can I tell a nymph tick from an adult by sight when the specimen is tiny?
Larvae have six legs, while nymphs and adults have eight, but overlapping or hidden legs can make the count uncertain in a phone photograph. Size alone is not a reliable substitute for a clear view. Record the count as unknown if necessary, and let an appropriate expert evaluate the available features. That uncertainty should not delay prompt removal of an attached tick or advice about a bite.
What are common non-tick lookalikes I should consider when checking a bite?
Small arthropods and debris can resemble ticks in an unclear photograph. Record the visible body outline, legs if discernible, size reference, and where the specimen was found. Avoid a confident identification from movement or a single obscured feature. If you are unsure what was attached or what an exposure means, ask an appropriate healthcare or public-health service rather than using an app image match to dismiss the concern.
If I can identify a tick type visually, can I assume anything about disease risk?
No. A visual label cannot show whether a tick carries a pathogen or determine the outcome of an exposure. An attached tick should be removed promptly following appropriate public-health guidance, without waiting for identification. Seek healthcare advice if rash, fever, or concerning symptoms develop and mention the tick exposure. If a service requests the specimen, follow its instructions; do not delay care while waiting for a test or identification result.