

Tick Species Identification: Photo Clues and Next Steps
Practical tick species identification advice: which photo clues can narrow a match, common lookalikes, and safe next steps before relying on a single image.
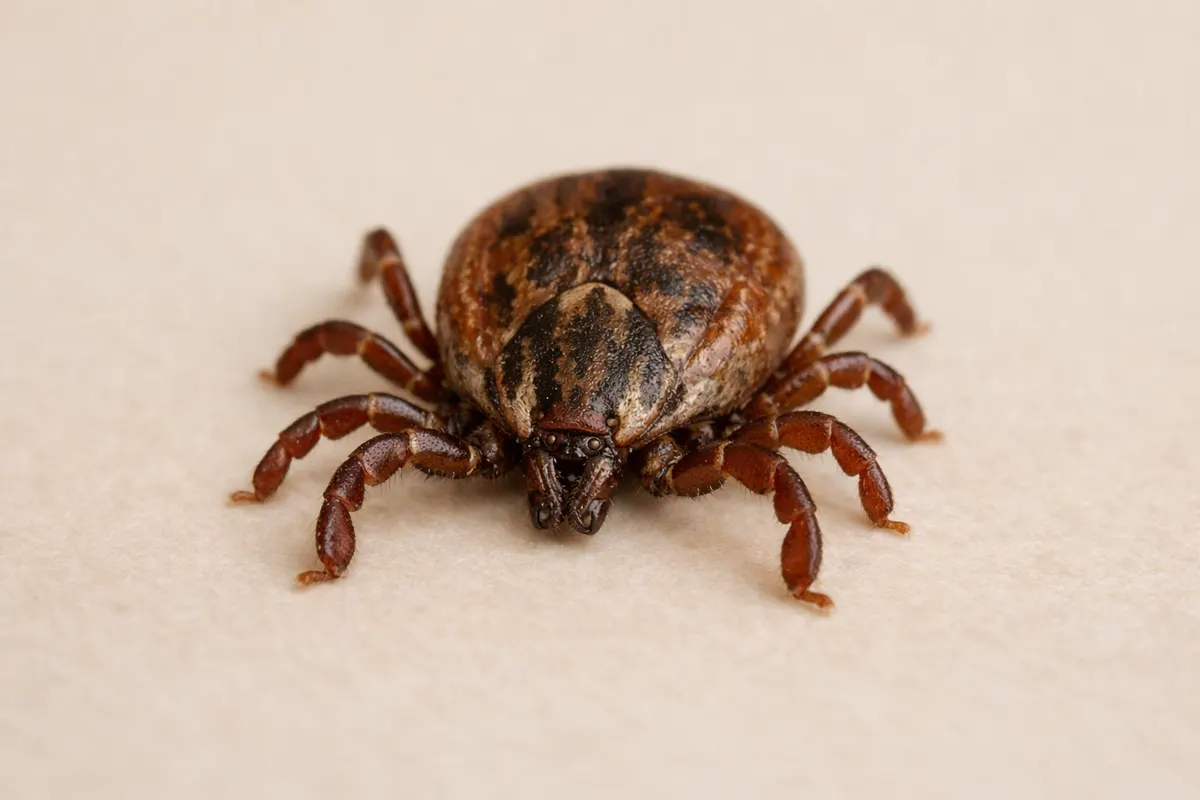
Quick, practical answer for tick species identification
You can often narrow a photographed tick to a small group of likely species using a few clear visual features and context, but a single phone photo rarely delivers a definite scientific ID. For many common regional ticks, high-confidence clues include body shape, size relative to a scale, dorsal markings, and the presence or absence of a scutum (a hard plate).
When using Tick Detector - Tickzen as your first pass, treat app feedback as a triage step: it helps prioritize whether a specimen looks like a high-risk species or a common lookalike, but it should not be the only evidence you rely on for medical or veterinary decisions.
If you only need a practical next step, follow three quick checks: note the tick’s approximate size with a scale in the photo, capture a clear view of the dorsal surface and mouthparts, and record where and when the tick was found. Those three items often turn an uncertain photo into a reasonably useful identification.
Tip: keep this short checklist handy as a field-oriented tick identification guide you can use before taking or submitting photos. Clear, contextual images increase the chance of a useful match.
- Take a photo that includes a coin, ruler, or known-size object for scale — size narrows many species.
- Aim for a dorsal shot and a close view of the head/mouthparts; those views hold the highest diagnostic value.
- Record location, host (human, dog, other), and habitat — context points toward likely regional species.
- Use this tick identification guide as a simple pre-check before relying on any single app result.
What tick species identification means and practical limits
Tick species identification means using observable traits to assign a specimen to a species or to a small group of candidate species. In practical, photo-based work this is often a best-fit process: you weigh visible features, compare them to known patterns for local species, and decide how confident you are. For Tick Detector - Tickzen users, that process is structured into visual checks and confidence levels rather than a single definitive verdict.
A photograph can prove some features (for example: a clear scutum pattern or the presence of long palps), support others (overall size, leg color), and leave others ambiguous (microscopic setae, subtle genital differences). Knowing which features are typically diagnostic helps you interpret results: some species pairs are distinguishable only with a microscope or genetic test, while others show obvious, field-level differences.
In field practice, identification is about balancing three things: photo evidence, contextual data (host, location, season), and diagnostic importance. For example, finding a tiny nymph on a person in spring in a region where a particular vector species is common changes how you treat a tentative photographic match compared with finding an adult tick on a leather jacket.
Using Tick Detector - Tickzen should be seen as one step in that balance: it speeds up the visual comparison and points out likely lookalikes, but it also flags uncertain cases where further inspection or expert review is recommended.
- Photo evidence: shows shape, markings, leg count, and sometimes mouthpart length.
- Context: host species, exact location, and season alter probability of specific species.
- Diagnostic certainty: field-level IDs vs. lab-level IDs — photos usually provide the former.
- When in doubt, collect or preserve the specimen for expert verification rather than relying on one image.
Tick visual clues to check in photos
Certain visual cues consistently provide the most reliable information from a photo. Start with overall body shape (rounded vs. elongated), which distinguishes hard ticks (Ixodidae) from soft ticks (Argasidae) at a glance. Next, focus on the scutum: its size, color, and any distinctive patterns or central markings are often species-specific.
Mouthparts and palps are critical. In many hard tick genera the relative length of the palps versus the basis capituli (the tick’s head area) tells you which group you’re looking at. A low-angle close-up that shows the mouthparts from the front or slightly to one side is more useful than a single top-down photo.
Leg color and banding, presence or absence of festoons (small grooves along the rear edge), and whether the body has a clear ornamented pattern or a uniform color are secondary but valuable clues. For nymphs and larvae, color and scutum pattern often remain legible even when the size is small.
Remember to include the context in the photo or metadata: note whether the tick was on a human, a pet, or found free in leaf litter, plus the geographic location and date. Those non-visual clues narrow the candidate list enormously.
- Dorsal scutum pattern and ornamentation.
- Relative mouthpart length and palp shape.
- Body shape: rounded versus flattened.
- Leg color/banding and presence of festoons.
- Scale or coin in frame to show size.
Step-by-step photo workflow for better identification
Step 1 — Stabilize and scale: Place the removed or collected tick on a flat neutral background (plain white or gray paper). Put a coin or ruler beside it and photograph from above and from the side. These two angles give size and profile data that are often decisive.
Step 2 — Capture diagnostic views: Take a close, in-focus dorsal shot (top-down) and a separate close shot of the head/mouthparts. If the tick is alive and active, photograph carefully to avoid harm; if it’s removed already, gentle pinning under a clear plastic slide helps stabilize small ticks for clearer images.
Step 3 — Add context: Record the host (human, dog, etc.), where the person or pet was found (backyard, forest, urban park), and the date. Enter this metadata into any identification workflow, including notes for Tick Detector - Tickzen, to help the algorithm and any human reviewer weight likely species.
Step 4 — Use a systematic comparison: Compare your images against local species profiles focusing on scutum pattern, mouthpart length, and leg banding. Tick Detector - Tickzen’s visual checklist can be used as a rapid comparator, but treat its output as a ranked set of candidates rather than a final authority.
Step 5 — Decide next actions: If a photo matches a high-risk species and the tick was attached, consult medical or veterinary guidance promptly. If the ID remains ambiguous, preserve the specimen in a sealed container with a moist paper towel and seek expert verification through a local extension service or diagnostic lab.
- Place the tick on a plain background and include a scale in every photo.
- Take both a dorsal and a head/mouthpart close-up in good light.
- Log host, location, and date as part of the photo record.
- Compare against local species checklists before concluding.
- Preserve the specimen for lab verification when accuracy matters.
Examples
Example 1 — Adult tick on a dog in suburban grass: A clear dorsal photo showing a distinct white dorsal ornament plus measurements from scale can quickly point to an ornamental Dermacentor species or an adult Amblyomma, depending on region. With Tick Detector - Tickzen, these markers often produce a small set of high-probability matches the app highlights for you to compare.
Example 2 — Tiny nymph on a person after a spring hike: Nymphs are small and often lack dramatic ornamentation, but a close headshot that reveals relatively short mouthparts and uniform leg color can reduce candidates to the local Ixodes or Haemaphysalis groups. Context (woods, leaf litter, known local species) makes the photo far more useful.
Example 3 — Detached tick found in the house: A flattened, possibly damaged specimen photographed against a scale may still yield a genus-level ID by scutum remnants and leg placement. When specimens are damaged, combine what you can see visually with household context (pets, stored firewood, past travel) to prioritize potential species.
Example 4 — Rare or unfamiliar specimen: If a photo shows unusual markings or proportions not matching regional checklists, treat the image as a priority for expert review rather than trying to force a match. Tick Detector - Tickzen can help you assemble the needed diagnostic views and provide a ranked list of lookalikes to present to a lab or entomologist.
- Adult on pet + ornamented scutum = often species-level narrowing.
- Nymph on person + short mouthparts = genus-level candidate narrowing.
- Damaged or flattened specimens need multiple photos and context for reliable guesses.
- Unfamiliar markings should prompt expert verification, not confident DIY calls.
Limitations
Photo-based identification has clear limits. Some diagnostic traits require microscopic examination or dissection, and several medically important species are distinguishable only through subtle genital or pore differences invisible in standard phone images. For example, differentiating between certain Ixodes species frequently requires lab work.
Confidence levels matter: a high-confidence photo ID is one where multiple diagnostic clues align (size, scutum pattern, mouthparts) and regional context supports the match. Partial matches — where only one or two traits are visible — should be treated as hypotheses, not confirmed identifications.
Safety decisions should not rely solely on photo IDs. If there’s any concern of pathogen exposure after an attached tick bite, consult medical or veterinary professionals according to current public-health guidance rather than waiting for definitive species confirmation. Use the app’s output to inform urgency but not to replace clinical advice.
When in doubt, preserve and submit the specimen. Sealing a tick in a small container, refrigerating if necessary, and sending it to a university extension, public health lab, or an accredited diagnostic service is the standard route for definitive identification and disease testing.
- Some species require microscopic or genetic tests to confirm.
- Partial photographic evidence yields lower confidence and more lookalikes.
- Medical or veterinary guidance should inform treatment decisions, not a lone photo ID.
- Preserve questionable specimens for lab or expert verification.
Related guides
Compare your photos against a practical identification chart
If you want a structured, printable checklist and comparison chart to use while photographing or preserving specimens, view the Tick Detector - Tickzen identification chart. It lays out the exact views and context notes that increase confidence in photo-based IDs and helps you decide when to preserve a specimen for lab confirmation. Use the chart as a next step after you’ve taken clear dorsal and mouthpart photos; it’s designed to work with the visual checklist in this article and to point you at durable, region-specific ID cues. Access the chart here: https://tick-detector.app/tools/tick-identification-chart
Take the next step →Frequently asked questions
What common tick types might this photo show when I'm using Tick Detector - Tickzen?
Common tick types you’re likely to encounter depend on region and season, but photos commonly reveal candidates from a handful of genera: Ixodes (blacklegged or deer ticks), Dermacentor (dog ticks), Amblyomma (lone star and related ticks), and Rhipicephalus (brown dog ticks). When you submit a clear dorsal plus mouthpart photo and location metadata, Tick Detector - Tickzen can usually narrow the result to one of these groups. Remember that for certain species within a genus, microscopic traits or lab tests are required for definitive separation, so use the app’s suggestions as prioritized possibilities rather than absolute answers.
How do I take photos that show the best tick visual clues for identification?
Good photos start with lighting and scale. Use natural daylight or a diffuse light source to avoid glare. Place the tick on a plain background and include a ruler or coin so size is obvious. Take a top-down (dorsal) photo and a close shot of the head and mouthparts. If possible, take a side profile to show body shape. Avoid extreme zoom that blurs detail; instead move the camera physically closer and stabilize it. These images capture the tick visual clues that most reliably differentiate species in a rapid review.
Can I use Tick Detector - Tickzen to confirm a dangerous species from one photo?
Tick Detector - Tickzen is useful as a first-pass identification tool and can flag likely high-risk species from clear photos, but it should not be used as the sole confirmation for medical or veterinary action. Use the app to prioritize urgency and to collect the right follow-up images. If the tick was attached or you’re concerned about exposure, consult a healthcare or veterinary professional promptly and consider sending the specimen to a diagnostic lab for definitive confirmation.
Where can I find a practical tick identification guide tailored to photos and next steps?
A photo-focused tick identification guide should walk you through capturing diagnostic views, recording context, and deciding when to preserve a specimen for lab verification. The checklist in this article provides those steps. For a quick visual reference and an identification chart tailored to practical field checks, visit the Tick Detector - Tickzen identification chart at https://tick-detector.app/tools/tick-identification-chart to compare common local species and preparation steps for expert review.