
Brown Dog Tick: Identification, Risks, and What to Do
Learn how to spot a brown dog tick, what clues photos can (and can’t) prove, and the practical checks to take before you act or call a vet.
Quick answer: spotting a brown dog tick
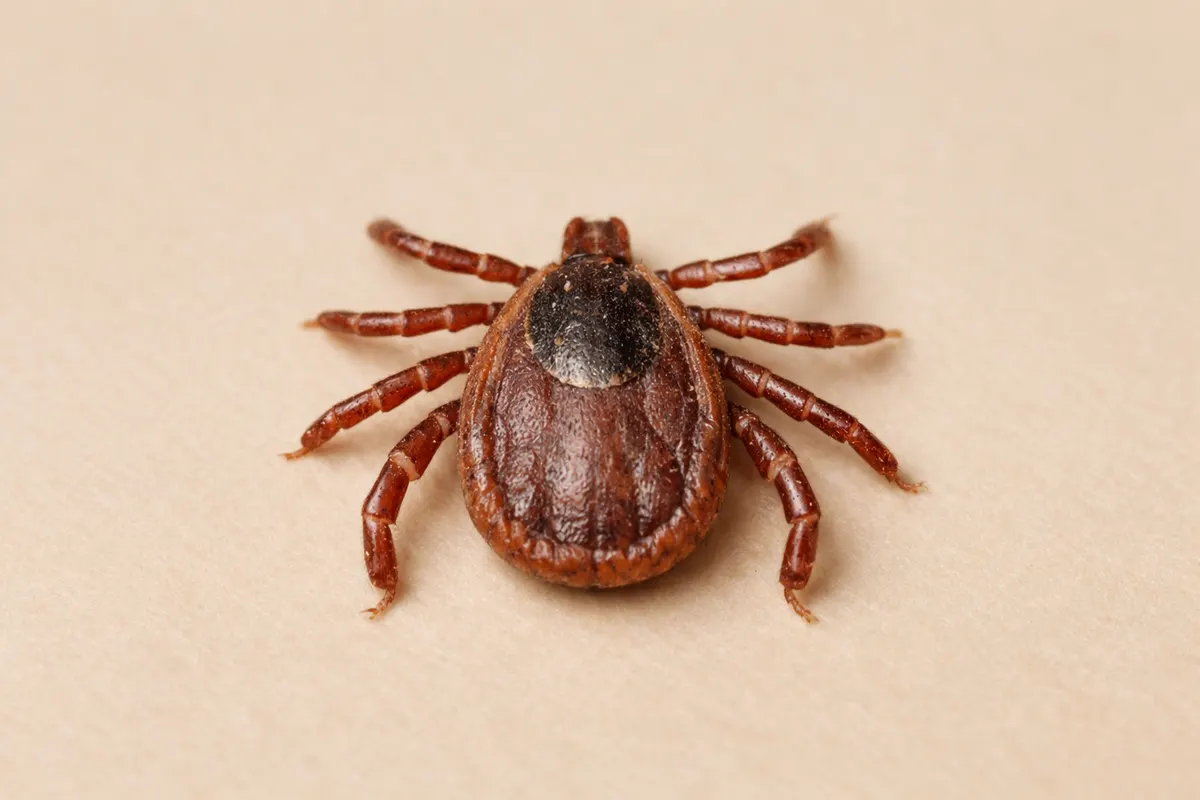
A brown dog tick is usually a small, uniformly brown tick commonly found on dogs and sometimes inside homes. Adults are typically reddish-brown and oval when unfed; engorged ticks swell and change shape and color. If you have a clear, top-down photo showing the tick’s body color and leg placement on a dog, you can often narrow identification to the brown dog tick with moderate confidence.
Photos alone cannot confirm pathogens or guarantee species for every life stage. A good image of an adult tick on a dog, taken in good light with a visible scale (ruler or coin), is the most useful single piece of evidence. Blurry close-ups, heavily engorged ticks, or photos of larvae are weaker evidence and may need follow-up.
Use the visual check as a fast first pass: document the tick, evaluate visible clues, and then decide whether to remove the tick now, save it for vet testing, or monitor the dog. When in doubt—especially if the tick is attached, numerous, or the dog shows symptoms—contact your veterinarian promptly.
What a brown dog tick is and why it matters
The brown dog tick (Rhipicephalus sanguineus) is a species that prefers dogs as hosts and can complete its life cycle indoors. Unlike some ticks that quest on vegetation, brown dog ticks are well adapted to kennels and homes; infestations can develop if several ticks feed and reproduce inside the environment. That household tendency is one reason identifying this species matters for pet owners.
For dogs, brown dog ticks can cause localized irritation, anemia in heavy infestations, and they are known vectors for pathogens that affect dogs in some regions. Photo-based identification helps you choose the right immediate action—remove and monitor, keep the specimen for testing, or treat the environment—without assuming the animal is infected.
From a practical standpoint, identifying a brown dog tick changes the likely next steps: inspect indoor resting areas, examine the dog thoroughly, look for multiple ticks, and plan either removal and observation or veterinary follow-up. The species’ ability to survive and reproduce in homes makes early detection and correct identification especially helpful for preventing a wider infestation.
Key visual and contextual clues for brown dog tick
Use a checklist of visual and context clues—some clues give high confidence, others suggest only a possibility. Look first for adult features: an even, reddish-brown color across the body (no bright white or patterned scutum), an oval body when unfed, and eight legs (adults and nymphs; larvae have six). If the tick is on a dog, that context raises the prior probability that it could be a brown dog tick, because dogs are its preferred host.
Engorgement changes appearance: a once-flat, reddish tick can become grayish or pale and ballooned after feeding. This makes color and shape less reliable for engorged specimens. Life stage matters too—nymphs and larvae are smaller and harder to identify from photos, so even a clear photo of a nymph may be ambiguous.
Environmental and behavioral clues help: finding a tick inside the home, in a crate, or on carpeting near where a dog sleeps is more consistent with brown dog tick behavior than ticks picked up while hiking in leaf litter. Combine visual marks with location and timing to increase confidence.
- High-confidence clues: uniform reddish-brown adult, dog host, indoor/kennel location, visible legs and oval shape.
- Moderate clues: small size on dog (could be nymph), visible scutum without white patterning, close-up showing mouthparts consistent with common dog ticks.
- Low-confidence/ambiguous: engorged tick (shape altered), blurry or low-light photos, larvae (six legs) or very tiny nymphs.
- Photo setup tips: take a top-down and a side shot, include a small ruler or coin for scale, steady focus on legs and dorsal surface, and good lighting without shadows.
Step-by-step workflow to check and act on a brown dog tick
1) Stay safe and document. If you find a tick on your dog, keep the dog calm and avoid squeezing the tick. Take multiple photos from different angles: top view to show body color and scutum, side view to show profile and engorgement, and a close shot showing legs and mouthparts if possible. Include a scale reference like a coin or ruler. Do not recommend uploading images to a website in lieu of vet care; treat photos as decision-support evidence.
2) Decide removal and preservation. If the tick is attached and immediate removal is needed, use a fine-tipped tweezers or a tick tool: grasp the tick as close to the skin as possible and pull straight out with steady pressure. After removal, place the tick in a small sealed container or tape it to paper if you plan to save it for identification or testing. Avoid squeezing the tick body, which can push fluids into the bite site.
3) Use the evidence to triage action. With good photos and a preserved specimen, you can run a quick visual checklist (see Key Clues) to assess whether the tick looks like a brown dog tick and whether it was attached long enough to raise concern. If the dog is healthy, you may monitor for 2–4 weeks and check for fever, lethargy, lameness, or loss of appetite. If symptoms appear or the tick was engorged or numerous, contact your veterinarian promptly.
4) Follow up on environment and prevention. Brown dog ticks can breed indoors. Vacuum bedding and carpets, treat dog bedding, inspect crates and baseboards, and discuss appropriate environmental control with the vet or a professional pest control service. For heavy or repeated infestations, coordinated treatment of the animal and the environment is often necessary.
- Photo checklist: top-down, side view, close-up of legs/mouthparts, scale reference, annotate where on the dog you found it.
- Removal checklist: fine-tipped tweezers, steady straight pull, disinfect bite site, save tick in sealed container if possible.
- Monitoring checklist: note bite date, watch for signs (fever, lethargy, limp), follow vet recommendations for testing or preventive meds.
- Environmental next steps: inspect sleeping areas, wash bedding in hot water, vacuum thoroughly, consider professional advice for persistent infestations.
Examples
Example 1 — Single adult tick found on a dog after a walk: You spot a single brown, oval tick on the dog’s shoulder, not heavily engorged. Photograph the tick with a coin for scale, remove it carefully with tweezers, save it in a small sealed container, and monitor the dog for two weeks for fever or behavior changes. No immediate lab testing is usually required unless symptoms appear.
Example 2 — Multiple small ticks found indoors: You discover several small ticks on the dog and in its crate. Photograph a few examples for reference, collect and preserve samples, and call your veterinarian. This pattern suggests an indoor infestation; treat the dog and consult a pest control professional or your vet for environmental steps because repeated infestations often need coordinated removal and cleaning.
Example 3 — Tiny nymph on fur, photo blurry: A tiny tick is seen near the dog’s ear; the only photo is slightly out of focus. Because nymphs are hard to identify, act conservatively: remove the tick carefully, save the body if possible, and if the dog develops any symptoms or the area becomes inflamed, contact the vet. If you rely on digital identification as a first pass, retake clearer photos before making treatment decisions.
Example 4 — Engorged tick on a puppy: An engorged tick on a young dog can cause more concern because of blood loss risk and the higher chance a puppy shows systemic signs. Photograph the tick, remove and save it, and schedule a vet check—especially if the puppy becomes lethargic, loses appetite, or shows abnormal bleeding.
- Single adult, outdoors: document, remove, save, monitor.
- Multiple ticks indoors: document multiple specimens, remove, consult vet and consider environmental control.
- Blurry or nymph-stage photo: preserve specimen when possible and seek clearer images or professional ID.
- Engorged ticks on young/small dogs: remove, save, and seek veterinary advice sooner rather than later.
Limitations
Photos can show species-level clues but cannot detect pathogens. A visual ID—even with a perfect photo—does not tell you whether the tick carried bacteria or protozoa. Blood-borne infections require lab testing of the dog or specialized testing of the tick at a diagnostic lab. Treat photo-based identification as a triage tool rather than a diagnostic result.
Uncertainty rises with life stage and engorgement. Larvae (six legs) and very small nymphs are often indistinguishable to the naked eye or through phone photos. Engorged adults change color and shape, masking species markers. If you suspect a nymph or only have an engorged specimen, plan for specimen preservation and veterinary consultation instead of relying solely on image-based identification.
Safety and timing limits: do not delay removal because you want better photos. If a tick is attached, remove it promptly with recommended technique. Likewise, do not assume absence of symptoms equals absence of infection; some tick-borne diseases develop over days to weeks. When to escalate: multiple ticks, heavy infestations, engorged ticks on puppies or small dogs, or any odd clinical signs warrant a vet visit.
Verification options: for certainty you can bring the preserved tick to your vet or local extension service for morphological identification, or send it to a diagnostic lab for species and pathogen testing. Each option has costs and turnaround times; use the level of clinical concern to guide whether lab testing is needed.
- Photo limits: cannot confirm pathogens or always guarantee species on nymphs/larvae.
- When to seek lab/vet help: multiple ticks, engorged ticks on young animals, abnormal symptoms, or suspicion of an indoor infestation.
- Preserving evidence: store ticks in a sealed container with a slightly moistened paper towel or in 70% isopropyl alcohol if recommended by your vet or the lab.
- Timing rule: remove attached ticks promptly; do not delay removal to take extra photos.
Related guides
Run a fast check for a brown dog tick
After you document visible clues, use the Dog Tick Check tool for a guided checklist that helps you decide next steps—remove and monitor, save the specimen, or seek veterinary advice. The tool walks you through the photo checklist, removal basics, and monitoring timeline so you can act quickly and responsibly: https://tick-detector.app/tools/dog-tick-detector
Take the next step →Frequently asked questions
How can I tell a brown dog tick from other common dog ticks?
Brown dog ticks are typically uniformly reddish-brown and lack the bright white or patterned markings you see on some species like the American dog tick or certain Dermacentor species. Context matters: brown dog ticks are commonly found on dogs and indoors. A clear top-down photo that shows color, body shape, and legs increases confidence. For ambiguous cases—small nymphs, engorged adults, or blurry photos—save the specimen and consult a vet or local extension for confirmation.
Are brown dog ticks dangerous to my dog?
Brown dog ticks can cause irritation and, in heavy infestations, anemia. They are also known to transmit some pathogens to dogs in certain regions. However, a single bite does not mean disease transmission has occurred. Monitor your dog for signs like fever, lethargy, lameness, or appetite loss for several weeks after a bite. If you see symptoms or the dog had multiple ticks or an engorged tick, contact your veterinarian for testing and guidance.
Can brown dog ticks live in my house year-round?
Yes. Unlike many ticks that primarily live outdoors, brown dog ticks can complete their life cycle indoors and are known to infest kennels, carpets, and cracks near where dogs rest. If you find multiple ticks on your dog or in its sleeping area, treat the environment: wash bedding in hot water, vacuum thoroughly, inspect crates and baseboards, and consult your vet or a pest control professional about safe, effective treatments.
Will a photo alone tell me if my dog has a tick-borne disease?
No. A photo can support species identification in many cases but cannot reveal whether the tick carried a pathogen or whether the dog has been infected. Diagnosing tick-borne disease requires veterinary assessment and lab testing of the dog or specialized testing of the tick. Use photos to triage—document, preserve the specimen, and decide whether monitoring or veterinary testing is the right next step.